Monday, April 1, 2013

Easter Surf and Turf

So I know it's been a while since I've been very active on the blog scene... 7 and a half months to be honest. But there have been some good things happening since August. I went to a Professional Engineer's Exam review course in Denver for a week, spent my birthday with my Happy Husband, my sister and her boyfriend and some great friends in Washington, DC, came to terms with and went to my high school 10 year reunion, took the Professional Engineer's Exam and waited seven EXCRUCIATING weeks for my results, was accepted into an groundbreaking leadership program at work, had the honor of being in the wedding party of my closest high school friend, passed the exam and became a licensed PE in Maryland, had a fantastic holiday season with lots friends, family and cooking, traveled to Virginia 6 days for work, made it to Florida to visit my awesome parents for 10 days, and went on a weekend trip to Atlanta, GA to visit a college roommate that I hadn't seen since 2010. Needless to say, it was a busy 7 and a half months and I'm ready to get back into the kitchen (I never left the kitchen but the camera never really made it in much) and back into the garden this spring and summer.

Why, then, am I deciding to get back in to it??? Mostly thanks to those of you who actually read and enjoyed the posts from before. I also really enjoy the process but its really all because of my nagging and annoying supportive and encouraging friends and family. The following dish was going to be Easter dinner but ended up being Easter Monday dinner due to a 4PM post airport Wegman's sushi binge on Easter Sunday afternoon. Side note: If you have a Wegman's near you, I'm talking within 45 minutes, you need to check it out. In my opinion, Wegman's beats the pants off Whole Foods any day and costs much less. You can also get whatever name brand items you want at Wegman's instead of the 'crunchy granola' fancy brands at Whole Foods. I could go on about the over rated-ness of Whole Food's but that's not what you want to hear about...you want FOOD!! and food I shall give you.


The Happy Husband has been craving duck lately and they happened to have some fresh duck magret (aka duck breast) at Wegman's so I picked it up along with some U-10 scallops (this means there are less than 10 per pound), a pound of asparagus that was just the right thickness (a total personal preference) and some purple, yes I said purple, potatoes. This meal ran me about $35 and 700 to 800 calories per serving but it was a special occasion and we certainly don't eat $16/lb duck and $18/lb (I didn't get a whole lb) scallops and I had a light day of eating in anticipation of dinner.

Today's exciting topic is the art of pan searing!! Searing is a high heat method of cooking that results in a perfectly crisp food exterior and delectably juicy food interior. When you first learn to sear there will, more than likely, be lots of smoke and food that is burnt on the outside and raw on the inside or food that's more alike to jerky than it is to juicy greatness. So my suggestion would be to start with a food that's a bit less costly than gigantic scallops and farm raised duck.


Farmed duck has a very thick fat layer under the skin but this is not a tragedy. Duck fat is a fantastic fat to sear in, especially something like a duck breast or succulent sweet scallop. 

In order to successfully render (get the fat cooked out of the breast and into the pan) the duck you will need to cut cross hatches into the skin in approximately a half inch apart and just above the surface of the meat. Whatever you do, DON'T cut the meat. The process of rendering also applies to bacon. This is what happens when you cook bacon and the grease ends up in the pan at the end. 

You will need to heat your pan on medium high heat until a drop of water sizzles when it hits the pan. I also prefer to use a heavy bottom pan when searing as the pan will hold tremendous heat and you can slide it right into the oven to finish off the cooking. Mine is a flame orange le Creuset cast iron frying pan that was a Christmas gift and will be in my kitchen forever. I'll probably ask to be buried with it because I love it so much. Set the breast in, skin side down and begin to cook.
Do NOT touch the duck/steak/pork chop any other item you are trying to sear. You need to leave it alone to let the pan and the natural sugars in the meat do their thing. Once you get a nice crust (wait a few minutes and then you can peek under a corner) you can flip it over and start to sear the other side. If you are doing duck you will see the fat start to liquefy and drain into the pan and out of the skin. This is a good thing. You want the duck fat to render so you can cook the scallops in it. 

This is the time that, if I were not planning on cooking the scallops in the duck drippings, that I would put the hot pan directly into a preheated 400 degree oven to finish cooking the duck/steak/pork chop to the desired level of doneness. I however had to transfer the duck to a foil lined cookie sheet so that I could get the scallops into the fatty goodness. 


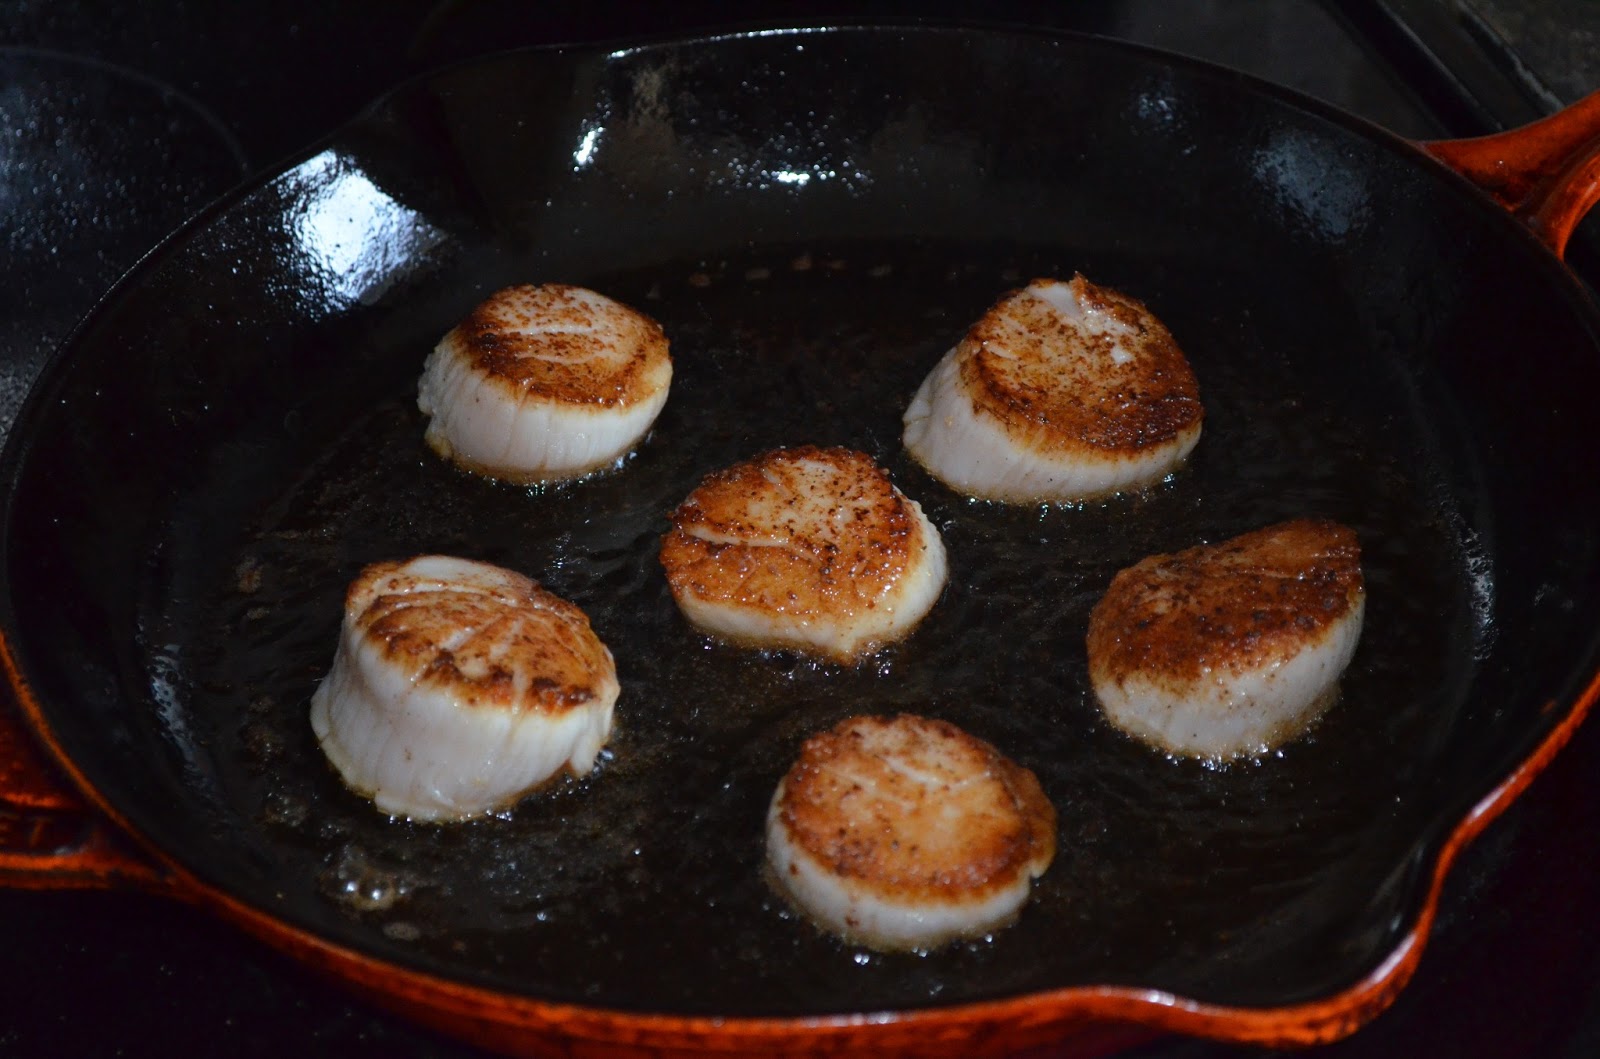
The searing of the scallops is exactly like that of the duck except for one little difference. The scallops cook much more quickly but still need to be moved only once, to their other side, in the process. For scallops you want them to be just warmed through, opaque (solid white) and slightly firmer than when they were raw. i prefer to season the scallops simply with a bit of garlic salt and pepper. This allows their inherent sweetness to come through. For the veggie, I roasted the asparagus in the toaster oven at 425 degrees dressed with a bit of extra virgin olive oil and a sprinkle of lemon pepper salt. The roasting process brings out some deliciously nutty flavors in the asparagus. Cook it until it becomes slightly crisp on the outside but still al dente (not soft and mushy yet). For the potatoes, I decided to make purple, Easter egg colored, garlicky mashed potatoes that I richened up with some sour cream and only one tablespoon of butter for 4 potatoes. 


To finish the dish and tie it all together, I sliced the duck and glazed it and the scallops with an orange marmalade sauce. I'm looking forward to practicing my plating more for you guys and hopefully doing the blog often enough to justify buying some prettier plates. 

If you have any questions about this dish or comments please leave them below and I'll get back to you at my earliest convenience. I'd also love to hear about any searing successes or epic failures that you've had recently.

Wednesday, August 15, 2012

Olympic Nachos

I'm baaaaack!! I took a bit of a blogging/cooking break during the Olympics. For those of you that don't know, I am moderately obsessed with the Olympics (both winter and summer) and obscure sporting events in general. I was pretty much glued to the television for the past two weeks.


One of my favorite foods to eat while being a sports spectator at home is a big plate of nachos. I rarely eat them while I'm out because I look like a ravenous crazy lady who hasn't seen food in a week. Lucky for me, the Happy Husband is a big fan of nachos as well so I get to make them about once a month or so.

This time of year is my favorite time for nacho excellence because of the availability of fresh produce for yummy salsa. As I have said before, there's nothing like going out to the garden, picking some cilantro, tomatoes and jalapenos and throwing them together for a fantastic and healthy fresh salsa.


For the salsa, dice up your tomatoes, jalapeno and onions. I used two peppers (you can alter this based on your taste), about a cup and a half of tomatoes and three quarters of a cup of red onion. I also minced up about a teaspoon of fresh cilantro. Next, mix all of the veggies together in a glass bowl. Use a garlic press and add one clove of pressed garlic. If you don't have a press you can mince the garlic. Stir everything together add lemon or lime juice to coat the veggies. I used red wine vinegar because I didn't have any fresh citrus laying around. Add just a bit of olive oil and then season with salt and pepper to taste. I find that it is best to make the salsa before any nacho assembly to allow the flavors to come together.


Now for the pre-bake nacho assembly, use about two thirds of a regular size bag of chips. The best way to do this is in two layers so that you get cheese on every single chip. Put your first layer of chips down on a foil lined pan (easy cleaning!!). Next, add half of your ground beef taco mixture (click here for taco meat recipe). Sprinkle one cup of your shredded cheese of choice over layer 1. The fancy shredded Mexican blend that you find in the dairy aisle in the grocery store will be just fine. The last piece of layer 1 is pre-made queso sauce. The Tostitos brand is a favorite here at the Happy Husband Diner. Next repeat the process for the second layer and throw it in a pre-heated oven with the broiler on the low setting. Keep an eye on the nachos while they are in the oven, I have burned many a second layer during the cheese melting process.


Now that the cheese is yummy melted and the chips are warm and crispy its time to apply the toppings. For the salsa application make sure you STRAIN the juices before you put it on the chips that you have worked so hard to make crispy. If you don't strain you can end up with soggy nachos and those are just plain nasty. The next step is totally optional but I am a guacamole lover and suggest you at least try the green gooey stuff. Throw a couple of dollops of guacamole on the nachos for some added zest. The guac in the picture is Wholly Guacamole brand and was left over from a party but is a good one if you don't want to or don't have time to mash it up yourself.

Last step, plop the tray on the coffee table, dish up some sour cream if you like to dip your nachos, and enjoy your favorite sporting event (or just eat nachos for dinner).

Monday, July 16, 2012

The Zucchini Chronicles Part 2: Zucchini Soup


I think the Happy Husband and I are going to turn green by the end of the zucchini growing season!! I found a recipe for Zucchini Soup and, with several adjustments, I was pleasantly surprised at the tasty results. As you know, if you have ever tasted it, zucchini isn't the most flavorful food on the planet. It has a subtle sweet taste and is a great low calorie filler veggie. You can eat a TON of it, totally guilt free food! This recipe ends up being surprisingly creamy even though the only dairy is a little bit of butter in the beginning. This will make about 3.5 quarts of soup depending on the amount of stock/liquid you add.

The first thing you need to do for this soup is chop your onions and garlic. You will be puree-ing the soup later so just make sure they are pretty well broken down. This step doesn't have to be perfect! I doubled the found recipe and used two whole onions and about 20 cloves of garlic. The onion type is up to you. I went on a red onion craze at Costco so I went with them for the soup. I know it seems like a lot of garlic too. The flavor really mellows out after almost 90 minutes of cooking so don't be afraid. IF you are really worried, don't use as much.

OK, now that you have your veggies prepped... Next you need to 'foam' your butter. Foaming is just a fancy way of saying melt it but don't brown it. The easiest way for me to do this is to throw it into a cold pan and then turn the heat to medium low. When you start to see little white bubbles forming, you have achieved foaming. I used a whole stick of butter for my three pounds of zucchini that I added later. I think that six tablespoons would have definitely gotten the job done and made the soup even healthier.

The object of the onion and garlic in the pan with the butter is to 'sweat' the aromatics. This is just another fancy pants cooking term for cooking them on medium-low heat until they are soft and not browning at all. The sweating time is a great time to add some salt and pepper. The salt will help to draw some of the moisture out of the onions and garlic (making the softening happen faster) and the pepper will become tastier with the low heat. This process should take about 10 minutes or so, depending on the freshness of your onions and garlic. This tip is a little late but... when cutting onions you should stick them in the fridge for at least 30 minutes before you start your slicing. The onion releases and enzyme when you cut into it that becomes a gas and reacts with the water in your eyes causing the tears and discomfort. If you chill your onions the enzyme becomes less reactive. I use this method all the time and it really works!!

Once your onions and garlic are translucent (soft and getting easier to see through) its time to add the zucchini. Looking back, I wish I had used an 8 quart stock pot for my double batch of soup instead of the 4 quart sauce pot that you see in the photos. Keep the heat on medium low and sweat the zucchini for another 10 minutes or so. You want to draw out some of the moisture that is trapped inside. I used one of my baseball bat sized zucchini that had gotten out of control. Smaller ones are ok too and will be slightly sweeter.

The amount of liquid that needs to be added depends on the amount that is released by your zucchini. Add enough that it just barely covers your sweaty veggies. I keep using the term liquid because its totally up to you what you add. I added water with some powdered chicken bouillon. You can add low sodium chicken stock or, if you are of the vegetarian persuasion, add some low sodium veggie stock. The low sodium stock allows you to control the saltiness of your soup. This option is key for those of you with Happy Partners with less than perfect blood pressure :)

Simmer your brothy mixture for about 45 minutes. If you prefer a brothy soup you are almost done! Taste your broth and season according to your preferences. I added a bit of pepper and some Italian dried herb mix at this step. For you broth with chunk soup lovers, you are done. If you prefer a smooth creamy texture, there is one last step. Use an immersion blender to puree your soup until its smooth. Never fear if you are without the immersion blender, VERY carefully blend in a blender or food processor in batches until smooth.

Soup done!!! I would suggest serving this yummy soup with some toasted, garlic rubbed crusty bread and a dollop of sour cream or a tablespoon of heavy cream plopped in the middle!! The one additional step you could take would be to strain your soup. You would only need to take this step if you used an older zucchini. If you take a look a the finished product picture at the top you can see some white flecks in the soup. These are the pieces of seed that didn't break down during the blending process (not a problem with younger fruits). The bits didn't bother the HH and certainly didn't bother me so I left them for some added texture. I froze most of the soup in individual servings for taking to lunch at the office when in cools off later in the year. I hope you enjoy the soup! The zucchini are still pouring out of the garden so be ready for some more garden creations!

Sunday, July 8, 2012

The Zucchini Chronicles Part 1: Zucchini Bread


OK... so perhaps four zucchini plants was a bit ambitious for the Happy Husband and I. I have been giving zucchini away like nobody's business and still they are getting out of control. It could be because there are actually two stalks per plant which means I really have more like eight zucchini plants for two people. So far, I have made two 2 loaf batches of zucchini bread but I'm thinking I'll have anywhere from 8 to 12 loaves in the freezer before the growing season is through. Traditional zucchini bread recipes call for some type of nut to provide a bit of extra texture and flavor. I have a mild pecan/walnut allergy so on the first batch I used sunflower kernels instead. The flavor was nice but the HH said he NEEDED chocolate in batch number two. Off I went to pick up some semi-sweet morsels and that's where this batch for the post comes in.


I am not one to use pre-written recipes often. However, baking is a different story. You will get very frustrated, very quickly if you attempt new things with out proper measurements. I used the Better Homes and Gardens recipe (click to see recipe) and substituted the nuts for the same measurement of chocolate chips. The first order of business is to grate the zucchini. I prefer using a box grater for this because it is very stable and contain the shavings until you are ready to use them. You will want to be careful to leave a stub of zucchini so that you don't grate fingernails or fingertips into your bread. While it would be a nice added protein, I don't think your Happy Partner's or other zucchini bread recipients would be too thrilled to find a fingernail in their pastry.


Next, follow the recipe by mixing the wet together in one bowl and the dry ingredients together in another bowl. The chocolate chips come in later so don't include them in either bowl just yet. Now you need to combine the wet and dry together. Make a well (a hole in the center) in the bowl of the dry ingredients. Dump the entire bowl of the wet into the dry. Mix with a spatula or fork until it is just combined, lumps are OK. The final step before loading the batter into your greased pan is to fold in the semi-sweet morsels. Take care not to over mix the batter as it can cause your bread to be tough.


Load your batter into your greased pan/pans (I did a double batch here) and pop them into your pre-heated oven. Follow the recipe directions on cooking time. About 5 minutes before the bread is supposed to be done you need to check it. Stick a toothpick into the center of your loaf. The recipe will tell you that if it doesn't come out clean you need to leave it in longer. I like to take it out when its slightly under cooked (the toothpick will be kind of gooey but not runny). This yields a more moist bread and I think it helps if you are going to freeze it after cooling.


Be sure to allow the loaves to fully cool before wrapping tightly with plastic wrap for storage. As you can see in the far loaf in the picture the crispy edges are pretty darn amazing when hot and I just couldn't help myself. My favorite way to enjoy the bread is for breakfast. I slice it, toast it and top it with whipped cream cheese. Its a convenient little to go package for my commute during the week. The Happy Husband has another preferred method of consumption. He likes it sliced and then slathered with cupcake icing. To each is own I suppose... Stay tuned for more zucchini recipes :)

Monday, June 25, 2012

Stuffed Zucchini Blossoms and other Garden Goodies


First off, I wanted to say that I am sorry that it has been so long since my last post. The garden is really starting to explode with tasty, fresh veggies and between family parties and weddings things have been terribly busy at the Happy Husband Diner. I know that I have been posting a lot about meat but there really is a lot to be said for a yummy tapas style vegetarian dinner now and then. Each of the dishes in this post are meat free, delicious and contain at least one home grown ingredient.


When I first mentioned to the Happy Husband that we were going vegetarian for the night I got a bit of a strange look. But then... I told him I was going to make tempura fried, stuffed zucchini blossoms he became very interested. Normally I wouldn't be too excited about sacrificing 5 perfectly viable zucchini babies but one of my engineering classmates turned professional chefs suggested I try this method of preparation. Plus I have 4 zucchini plants and only two people to eat the bounty. (I'm sure there will be other zucchini posts to come.) So I did some reading on how to prep these little beauties. If you can buy them in the store, (I'm sure they will be over priced and not as fresh), then you don't have to worry about this step. If you are lucky enough to pick them within minutes of stuffing and serving, be sure to look out for ants hiding in the blossoms. They probably won't make you sick if you miss a couple but I don't think anyone is in that much need of protein. Once they are clean, stuff them with your stuffing of choice. Make sure the blossoms can pretty much close around the stuffing so that it doesn't melt out during the frying process.


For the stuffing this time, I went with goat cheese, quinoa and marinated artichoke hearts and seasoned the mixture with a bit of salt and pepper. You want to have enough goat cheese (sticky ingredient) that you can ball up the stuffing and it will stay in the shape you make. If you aren't using cheese you can always add a bit of egg to help coagulate the stuffing (make it stick together) during the cooking process. I used a simple tempura recipe from the Joy of Cooking cook book. The basic ingredients for tempura are cold beer/seltzer, flour and baking powder/leavening agent. You can find a recipe anywhere online too.


Dip the stuffed blossoms into the tempura batter and then fry to an even golden brown. I like to drop a little bit of batter directly into the hot oil to tell that it is hot enough/not too hot to cook the blossoms. Needless to say the Happy Husband and I were both pleasantly surprised at the outcome!! The blossoms came out a perfect golden brown and the stuffing was hot but not molten. Not molten is a good thing because the HH has no self preservation reflex. He would pop a still bubbling fried item right into that mouth of his if I weren't there to stop him.
Caprese Salad
The other goodies on our tapas buffet were home grown kale chips (I used garlic salt and pepper to season them), caprese salad (with home grown basil and home made mozz), and pickled home grown beets. Click on the dish names for directions on how to make those items. I have posted photos below of each of the dishes.
Kale Chips
Pickled Beets

Tuesday, June 5, 2012

Garden Bounty


This box may not look like much right now but this one day harvest from our back yard garden will be turned into some amazingly tasty goodies for the Happy Husband and I. The radishes will go to my dad because he is the best dad ever! (And possibly because the HH and I don’t eat radishes, ha ha). The beets are destined for pickling thanks to me being introduced to pickled beets back in my Virginia Tech days by my roommate Kristin. Her mother makes, quite possibly, the best pickled beets that I have EVER tasted. The collard greens will be washed and stored in the fridge for a day or two until I am ready to simmer them with ham bits, hot sauce and diced onion and garlic. Tonight, however, the kale and turnips are headed to the dinner plate in two separate preparations.


This is what turnips are more likely to look like if you are searching for them in a store. They might not even have the stems of the leafy tops left but I thought the pale green added to the photo so I left it on. There really is nothing better than pulling these suckers out of the ground and cooking them less than an hour later. Turnips can have a bit of a spicy bite to them but that gives them a fresh flavor and is nothing to be worried about. The spicy mellows out when you roast the turnips. You will need to peel them and cut them into wedges. Toss with olive oil, garlic salt and pepper and spread out on a baking sheet. Roast at 350 degrees until the edges just start to brown. I roasted some potato wedges on the same tray until they were starting to brown and crisp up on the edges as well.


Next to prepare the kale. Preheat your oven to 400 degrees or preheat your grill to high if you are feeling adventurous.  Rinse and pat the kale dry. Remove the ribs from the kale and tear it into big pieces. The rib is the hard lighter colored hard part that runs down the middle. It is very stringy and won't get crispy in the oven anyway. If you are a composter these will make a great addition but you should cut them in half to speed up the composting process. Once you have the kale torn into pieces, spread it out onto a baking sheet. Toss the kale with olive oil, salt and pepper. Only use the pepper if you really like a peppery bite, it will intensify in the baking process. I think it tastes just fine, if not better, with just salt and olive oil. This is where it gets a little tricky. The kale can burn quickly so don't walk away from it for more than about a minute. I never walk away because I tend to space out and come back to ashes on my cookie sheet. Never fun. Roast the kale chips until its crispy... it will brown on the edges but this gives it a nice nutty flavor so don't freak out. I like to toss it half way through if its in the oven so that it crisps up evenly.


I served the tasty garden harvest with garlic roasted potatoes and a juicy, tender grilled chicken breast. I didn't take the time to calculate calories on this one but I would estimate it to be around 450 calories for what you see on the plate. Maybe even less depending on the size of the chicken breast that you are using. Thats about one and a half turnips and one potato and a cup and a half of prepared kale chips. I'm very much looking forward to sharing more garden goodies with you guys!

Thursday, May 24, 2012

Holy Cow!!! Homemade Mozzarella


This was my second time making cheese. The first time, I used commercially produced pasteurized and homogenized milk. It was a collossal disaster and I nearly swore it off for life. I read online somewhere that using non-homogenized milk was much easier. You can get pasteurized non-homogenized milk at your local food co-op or hippie organic grocery store. You wil pay a ton for it!!! I however have the luxury of working in Pennsylvania Dutch (Amish) country a couple of times a week and have access to plenty of farms selling 'raw' milk. In case you didn't know, raw milk is basically milk straight from the cow, full fat and as fresh as it gets. And... the best part it is that a gallon of this Amish raw milk is that it is cheaper ($3.75/gal) than a gallon of regular milk at the grocery store. It is also great because you can basically touch the cows that the milk came from and see how they are being treated (for those of you that are into that kind of thing). This post is going to review the mozzarella process and the dish I made with it. Next I'll go over the ricotta process and that dish. Anyway... On to the cheese making!!


The first thing you will need to do is separate the cream that has floated to the top of the container from the milk. This can be a bit touchy if you don't have a siphon or a turkey baster. As we did not use our siphon and did not have a turkey baster, we ended up with a bit of a mess on our hands. I was mildly losing it and the Happy Husband was busy trying to calm me down and get the mess cleaned up. This photo was taken post mess and it was too hectic to take one during the process. Think crack in the bottom of a really full bucket spraying everywhere but in the pot. Fun... really.


The other two ingredients that you will need are citric acid and rennet. You can find citric acid in any grocery store that has a canning department or online. The rennet was a little harder to come by. Its definetly available online and comes in either tablet (animal based) or liquid (vegetable based) form. Its not cheap but a whole gallon of milk takes only a quarter teaspoon of the stuff. I managed to score the liquid version at the hippie co-op grocery store in the nearby college town. A digital thermometer will also be tremendously helpful here but you can use a traditional candy thermometer if you are really going to babysit the stuff. The first thing you will need to do is dissolve the citric acid and rennet in cold filtered water. Dissolve/dilute 1/4 tsp rennet in a 1/4 cup cold filtered water and dissolve 1 1/2 teaspoons citric acid in 1 cup of the cold filtered water.


Next you will need to heat your milk to 85 degrees F. This will take a while if you have just taken it out of the fridge, so it is the perfect time to set up your straining device. Stick a colander over a large bowl and line it with cheesecloth. You will probably need a second bowl if yours isn't super deep, I did. Whatever you do, DO NOT THROW OUT THE WHEY. The whey is the yellowish liquid that is left after the curds strain out. Once your milk makes it up to 85 degrees, dump in the citric acid mixture and give it a swirl with a slotted spoon.


It will start to look a little strange and curdle but nothing exciting is happening yet. Next, continue to slowly heat to 100 degrees F. This is when you stir in the rennet mixture. This is where I varied a bit from the recipe... I was so busy trying to take pictures that I wasn't paying attention to the next step (it didn't seem to make a huge difference). Let the milk/curds continue to heat to around 105 degrees (mine got up to 130), then turn off the heat and let the mixture sit with the lid on for the next 10 to 15 minutes.


Once the time is up take a sharp knife and cut the curds into cubes. Use a slotted spoon to move the cubes into the cheesecloth lined strainer. The curds will take a while to drain and can be helped along by moving them around in the cloth. You need to let them drain pretty much all the way until they stop dripping.


While the curds are draining fill pot with water and salt it heavily. You want this water to be about as salty as the ocean. Bring the water up to a boil and watch the temp and you will be using it once it gets down to about 180 degrees. The other thing that you need to be doing while the water is heating is breaking up the drained curds into one inch even pieces.


I kind of slacked on the next pictures because I had rubber gloves on to protect my hands from teh 180 degree water. Basically, you need to dunk the curds (I did two batches) in the hot water until they get melty. Stretch the curds once they come together until they become shiny and then form a ball. I was able to get a little over a half pound out of this batch.


So now you have these two little pillows of mozzarella goodness. What to do with them?? I'll tell you, make Caprese (ka-pray-say) Salad. I saved the larger one for later but I used the smaller one to make this beautiful dish.

This little beauty may have just been a side dish that I served with grilled mahi mahi steaks but in my opinion they were the star of the evening. I split the mozzarella into two servings of three slices each (1.8 oz total), one for me and one for the Happy Husband. The tomatoes, unfortunately, are not from our garden. They are from the grocery store and came in a gourmet medley box that was the same price per pound as the boring old grape variety. Each of those tomatoes were slightly larger than a golf ball. The basil is sliced in what is called a chiffonade. To get this decorative look, you just need to stack the leaves and roll them up like a cigar. Slice the across the cigar and you will get pretty little ribbons of your leafy herb or greens. Oh and that's right... the basil is from OUR garden.

Shamless home grown herb photo :)
Soon enough I will be able to say that the three main ingredients in Caprese Salad were hand made and grown from seed at my house. That's so cool to know exactly where your food is coming from. Last but not least, dress the salad with salt, pepper and a bit of good olive oil. This is a truly yummy bite of the summer veggies to come :)

The salad is about 200 calories. 120 from the mozzarella and 60 from the oil.